ကြ်န္ေတာ္ဘေလာ့ဂါေလးကို လာၾကည့္သူအေပါင္းတို႔ ကိုယ္စိတ္ႏွလုံးရႊင္လန္းၾကပါေစလို႔ဆုမြန္ေကာင္းေတာင္းလ်က္ပါ၊...

Tuesday 3 July 2018

♪ iPhone X စတိုင္နဲ႕အသံုးျပဳနိုင္မယ့္ - X Launcher Pro: Phone X Theme, IOS Control Center v2.0.0 Apk (27-June) ♫


X Launcher Prime:Phone X Theme, IOS Control Center Apk
အခုတင္ေပးလိုက္တာကေတာ့ iPhone X ဒီဇိုင္းနဲ႕ Android ေပၚမွာအသံုးနိုင္မယ့္ Launcher ေလးတစ္ခု ျဖစ္ပါတယ္ဗ်ာ။ Screen အေပၚကဒီဇိုင္းအေနနဲ႕ကေတာ့ iPhone X နဲ႕ထပ္တူပါပဲ။ တခ်ိဳ႕တခ်ိဳ႕ေသာ Feature ပိုင္းေတြနဲ႕ Setting အပိုင္းေတြလည္း iPhone X အတုိင္းအသံုးျပဳရမွာပါဗ်ာ။ နမူနာၾကည့္နုိင္ေအာင္လို႕ ေအာက္မွာ Screen Shot ေလးေတြျပေပးထားပါတယ္ဗ်ာ။ Android OS 4.1 ႏွင့္အထက္ဖုန္းမ်ားမွာအသံုးျပဳနိုင္မွာျဖစ္ပါတယ္ဗ်ာ။


MAIN FEATURES:
No Ads
We have removed the annoying ads in the pro, there will be no accidental disturbances, concentrate on immersion in what you have to do
OS11 Style Control Center
Swipe up to open Control Center; Set WiFi, Network, Brightness, Volume, Take Photo quickly.
Various Themes
We designe a cool Theme Center to provide various themes, Adaptive to the themes you select, which can bring you smooth interface like OS11 like experience.
Latest Wallpaper and Icon sets
The rich icons for Phone X library and latest wallpapers give you a comprehensive experience.
We also custom icon pack for popular apps to IOS Style.
Powerful App Manager
Swipe down to open App Manager; Find local apps and drop them to desktop quickly.
Apple Style Folder
We design a IOS Style Folder, you can drop an app to another to create a folder.
Cool 3D effects
We design 8 screen animation effects, like Breeze, Tunnel, Waves,Cube, Carousel, Tune out, Fan, Rotation.
Weather and Time widget
We provide a Weather and Time widget, you can long press on screen and drag it to screen. You can get the weather forecast in recent days.
Hide Apps
Double-finger zoom to enable hide application feature to Protect your privacy all around.
Screenshot Image     Screenshot Image

Screenshot Image     Screenshot Image

Screenshot Image     Screenshot Image

Screenshot Image     Screenshot Image
**  Step-1.ေအာက္က Download Button ကိုႏွိပ္လိုက္ပါ  


**  Step-2. "5sec". ေလာက္ေစာင္႕ေပးပါ။

**  Step-3. "  << SKIP AD >>   ".ကိုႏွိပ္ေပးပါ။

**  Step-4. Download Link က်လာပါလိမ္႕မယ္။


**  အဆင္ေျပပါေစဗ်ာ။

Credit.by   Pyae Phyo (MMiTD)


http://zipansion.com/1rDGw

♪ ဓါတ္ပံုေတြကို Professional ဆန္ဆန္ျပဳျပင္ႏိုင္မယ့္ - Adobe Photoshop Express Premium v4.3.497 Apk (28-June) ♫


Cover art
Android ဖုန္း္မွာဓါတ္ပံုျပင္ဖို႕ အတြက္ဆိုရင္ App ေတြအမ်ားၾကီးရွိပါတယ္။ အဲ့ဒီအမ်ားၾကီးထဲကမွ ဒီတစ္ခါ မိတ္ဆက္ေပးခ်င္တာကေတာ့ Adobe Photoshop Express Premium ဆိုတဲ့ App ေလးပဲျဖစ္ပါတယ္ဗ်ာ။ Photoshop ဆိုတဲ့အတိုင္းပဲ ဓါတ္ပံုတစ္ပံုကို တကယ့္ကို Professional ဆန္ဆန္ျပဳျပင္ေျပာင္းလဲေပးနိုင္မွာ ျဖစ္ပါတယ္ဗ်ာ။ Edit လုပ္ဖို႕အတြက္ အသင့္ေတာ္ဆံုး အေကာင္းဆံုး Tools ေတြလည္းပါ၀င္ပါတယ္။ Effect ေတြ လည္းမ်ိဳးစံုပါ၀င္ပါေသးတယ္ဗ်ာ။ jpg , png ဖိုင္အျဖစ္ Save နိုင္မွာျဖစ္ပါတယ္။ Photoshop ဆိုရင္ေတာ့အမ်ား ၾကီးညႊန္းေနစရာမလိုေအာင္ ေကာင္းျပီးသားပါ။ ေအာက္ဆံုးက Link မွာေဒါင္းယူသြား နိုင္ပါတယ္ဗ်ာ။ Feature ေတြကိုဒီထက္ပိုျပီး အေသးစိတ္ေလ့လာခ်င္တယ္ဆိုရင္ေတာ့ ေအာက္မွာ ရွင္းျပ ေပးထားပါ တယ္ဗ်ာ။ ဆက္လက္ေလ့လာနိုင္ပါတယ္။


PHOTO EDITOR
- Basics: Crop, straighten, rotate, and flip your photos. Remove red eye and pet eye.
- Auto-Fix: A one-touch adjustment for contrast, exposure, and white balance.
- Blemish removal: With user, friendly one touch, remove spots, dirt, and dust from your photos.
- Corrections: Instantly light up your selfie or photo with slide controls for clarity, contrast, exposure, highlights, shadows, blacks, whites, temperature, tint, sharpen, saturation and vibrance.
- Filters or Looks: A new smart way to turn any photo into artwork - choose from over 80+ preset eye-catching fun styles. You can control intensity of your looks for realistic photo effects.
- Watermark images: Easily add custom text or graphical watermark on images.
- Customization: Create and save your own Looks.
- Photo Frames: Add a distinctive personal touch to your photos with over 15 borders and frames. For a harmonious look, match the border color with the colors in the image.
- Raw photo support: Import and edit photos in raw format.
- Share: Easily share to all your favourite social sites: Facebook, Twitter, Instagram, and more.
- Watermark images: Easily add custom text or graphical watermark on images.
- Image resize: Use this option to resize an image before saving.
- JPEG Quality output – Customize the quality and size of your output image.

COLLAGE MAKER
- Create a photo collage in seconds with our photo grid feature.
- Choose from a wide variety of grid layouts.
- Pick any photo in the layout, and edit it the way you like with the photo editor.
- Hold, drag and drop to swap photo position, pinch to zoom in or out, or drag the handles to resize.
- Add new image or replace by simple selection.
- Adjust/fix a single image and apply any look.
- Change border thickness and color.
- Print directly from the application

AWESOME FEATURES
- One-touch Filters or Looks: Get additional filters for fun, fresh looks!
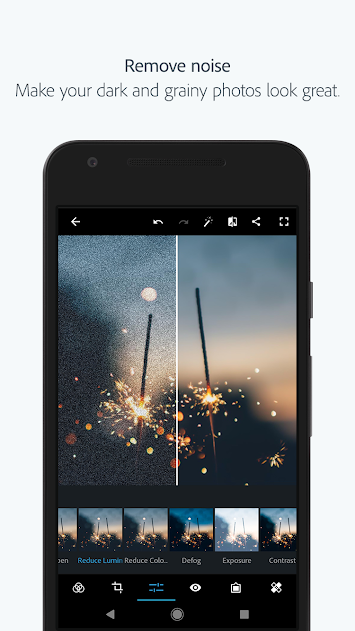
- Noise Reduction: Minimize unwanted grain and speckling in night photos and low light photos.
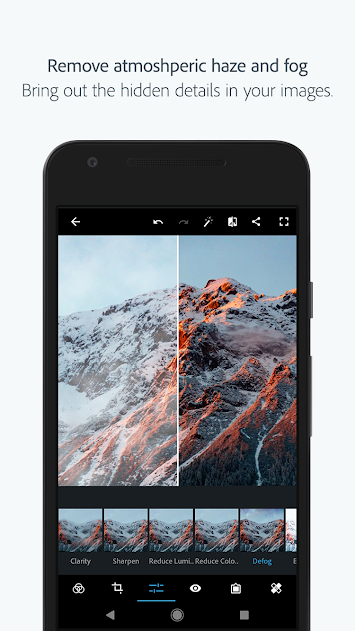
- Defog: Reduce fog and haze in photos.
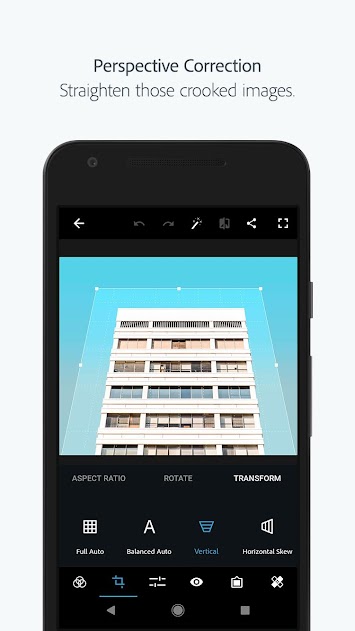
- Perspective Correction – Fix the skewed perspective photos with just a click! Choose from auto (balanced or full auto), vertical, or horizontal correction options.- Access Premium Features when you sign in with an Adobe ID:
- Access these features when you sign in with an Adobe ID

Once you’re done with the photo editor or collage maker, share your finished work directly to Instagram, Facebook, Twitter, WhatsApp, or your other favorite social networks!

Want to do more with your photos? Have a look at these other free Adobe Photoshop mobile apps:
- Photoshop Mix — Cut out and combine elements from different images, blend layers, and apply looks on your iPad or iPhone — anywhere you are.
- Photoshop Fix — Edit facial features, heal, lighten, liquefy, color and adjust your images to perfection — and then easily share them across other Creative Cloud desktop and mobile apps.
- Lightroom Mobile – Capture, edit, organize and share professional quality images from your smartphone or tablet.

Photoshop Express supports the following file formats:
- Photo: JPG, PNG
- Raw files: arw (SONY), cr2 (CANON), crw (CANON), dng, erf (EPSON), raf (FUJI), 3fr & fff (HASSELBLAD), dcr (KODAK), mrw (KONICA), mos (LEAF), rwl (LEICA), nef & nrw (NIKON), orf (OLYMPUS), rw2 (PANASONIC), pef (PENTAX), srw (SAMSUNG)
- While we aim to provide support for raw files from the latest camera models of most camera manufacturers, we cannot guarantee universal raw support.


Screenshot Image     Screenshot Image

Screenshot Image     Screenshot Image

Screenshot Image     Screenshot Image

Screenshot Image        Adobe Photoshop Express:Photo Editor Collage Maker- screenshot


**  Step-1.ေအာက္က Download Button ကိုႏွိပ္လိုက္ပါ  


**  Step-2. "5sec". ေလာက္ေစာင္႕ေပးပါ။

**  Step-3. "  << SKIP AD >>   ".ကိုႏွိပ္ေပးပါ။

**  Step-4. Download Link က်လာပါလိမ္႕မယ္။


**  အဆင္ေျပပါေစဗ်ာ။

Credit.by Pyae Phyo (MMiTD)


http://zipansion.com/1rDs9


ဗုဒၶစာ​ေပ ဆုိတဲ႔ ေဆာ႔ဝဲေလး Application For Android

 ဗုဒၶစာ​ေပ ဆုိတဲ႔ ေဆာ႔ဝဲေလးပါ။ဗုဒၶစာ​ေပ စာေပေတြကုိ မိမိဖုန္းထဲ႔ကေန ေလ႔လာဖတ္ရႈတတ္သူမ်ားအတြက္ အရမ္းတန္းဖုိးရွိတဲ႔ ေဆာ႔ဝဲေလးပါ။ ဒါအျပင္ -Internet ဖြင္​့၍ တရား​ေတာ္​မ်ား နာၾကားႏုိင္ျခင္းတရားစာအုပ္​မ်ားကုိလည္း အလြယ္ကူဆုံး ေဒါင္းရယူႏုိင္ပါတယ္။ဗုဒၶဘာသာဝင္သူေတြအတြက္ မရွိမျဖစ္ မိမိ ဖုန္းမွာေဒါင္းျပီး ေဆင္ထားသင္႔ပါတယ္။
ဝင္းလႈိင္-နည္းပညာ

ဖုန္းအတြက္ ျမန္မာစာအခက္အခဲကို ေျဖရွင္းေပးမယ့္ ေဆာ့ဝဲ APK

 ျမန္မာစာလြယ္လြယ္သြင္းနိုင္တ့ဲ Myanmar Font Changer 2018resret ေတြခ်မိလို႔ ပ်က္သြားခဲ႔ရင္လည္းစိတ္ပူစရာမလို႔ေနေတာ႔ဘူးေပါ႔Apkဖုန္းအမ်ိဳးအစား အစံုအလင္ကို တစ္ခ်က္တည္းနဲ႔ ျမန္မာစာ ျမန္မာေဖာင့္ လြယ္လြယ္သြင္းနိုင္တ့ဲ ေဆာ့ဝဲေလးဆိုေတာ႔ ပိုအစဥ္ေျပတာေပါ႔ ေဘာ္ဒါတို႔ေရ  ဖုန္းအမ်ိဳးအစား ၇/ မ်ိဳးအတြက္ ျမန္မာစာ ၁၀၀% ထည့္သြင္းနိုင္ပါတယ္။ Root မလိုပါဘူး ျမန္မာစာ အခက္အခဲရွိေနတ့ဲ ဖုန္းေတြအတြက္ နမူနာပံုေလးေတြႀကည့္ျပီး ေဒါင္းယူနိုင္ပါျပီလို႔ သတင္းေကာင္ပါးလိုက္ပါတယ္ခင္ဗ်
ေအာက္က Link မွာေဒါင္းယူပါ 6 M
ဝင္းလႈိင္-နည္းပညာ
Credit:   ေဆာ႕ဝဲလမ္းညြန္ And mobile mother

♪ ကြန္ပ်ဴတာသမားတုိင္းအတြက္ အသုံး၀င္တဲ့ - Deep Freeze Standard v8.53 + Full Patch (အသံုးျပဳပံုရွင္းလင္းခ်က္) ♫

https://image.slidesharecdn.com/dsemanual-140409080759-phpapp02/95/faronics-deep-freeze-server-enterprise-user-guide-1-638.jpg?cb=1397031037
Deep Freeze ဆိုတာက…
(၁) မိမိကြန္ပ်ဴတာ အတြင္းသို႕ Virus ၀င္ေရာက္ျခင္းမွ လံုး၀ကာကြယ္ရန္ (သို႕)
(၂) မိမိ၏ကြန္ပ်ဴတာကို အၿမဲတမ္း မိမိ္ရွိေနေစခ်င္ေသာ ပံုစံအတိုင္း ရွိေနေစရန္ (သို႕)
(၃) အျခားလူ တစ္ေယာက္ေယာက္က မိမိကြန္ပ်ဴတာကို ( Administrator Account ) ျဖင့္ အသံုးျပဳေနေသာ္လည္း မိမိ၏ ခြင့္ျပဳခ်က္မရဘဲ ( Deep Freeze ၏ password မသိဘဲ ) Software မ်ား Install ( or ) Uninstall ျပဳလုပ္မရျခင္း ၊
(၄) မိမိကြန္ပ်ဴတာအတြင္းရွိ မည္သည့္ Data ကိုမွ မိမိ၏ ခြင့္ျပဳခ်က္မရဘဲ ဖ်က္ဆီးျခင္း ( သို႕ )
(၅) Data မ်ားေပါင္းထည့္ျခင္းတို႕ ျပဳလုပ္မရနုိင္ျခင္း စသည္တို႕ကို ထိမ္းခ်ဳပ္ ထားႏိုင္ေသာ အလြန္ေကာင္းသည့္ System Security Software ျဖစ္ပါသည္။

Deep Freeze Software ကို Window XP , Mac OS , Window Server , Linux စသည့္ Operating System ( OS ) မ်ားတြင္ အသံုးျပဳႏိုင္ပါသည္။ System File ကိုသာမကဘဲ Data File ကိုပါ Restore ျပဳလုပ္ႏုိင္ေသာ Software ျဖစ္သည္။ Restart တစ္ႀကိမ္ ျပဳလုပ္ရံုျဖင့္ မိမိကြန္ပ်ဴတာ၏ မူလအေနအထားကို ျပန္ေရာက္ေစေသာ Software လည္းျဖစ္ပါသည္။ Deep Freeze Software ကို ေအာက္ေဖာ္ျပပါေနရာမ်ားႏွင့္ အေျခအေနမ်ဳိးမ်ားတြင္ အသံုးျပဳသင့္ ပါသည္။
(၁) အေရးႀကီးေသာ Data မ်ား သိမ္းဆည္းထားေသာ ကြန္ပ်ဴတာမ်ား၊
(၂) ေနာက္တစ္ႀကိိမ္ ျပန္ထည့္ရန္ ခက္ခဲေသာ Data မ်ား ရွိေနသည့္ ကြန္ပ်ဴတာမ်ား၊
(၃) Internet , LAN ခ်ိတ္ဆက္အသံုးျပဳထားၿပီး Virus အခ်ိန္မေရြး ၀င္ေရာက္ႏိုင္ေသာ ကြန္ပ်ဴတာမ်ား၊
(၄) Net Café ဆိုင္မ်ား ( user မ်ား အသံုးျပဳၿပီး က်န္ခဲ့ေသာ File မ်ားႏွင့္ Email ( or ) Internet မွ ၀င္ေရာင္လာေသာ Virus မ်ားအား မည္သည့္အခါမွ ျပန္ရွင္းေပးရန္မလုိ၊ Restart တစ္ႀကိမ္လုပ္ရံုျဖင့္ အားလံုးအေကာင္းအတိုင္း ျဖစ္ေစမည္။ )
(၅) မိမိကြန္ပ်ဴတာသည္ အၿမဲတမ္း မိမိ၏ကြန္ပ်ဴတာျဖစ္ေနေစရန္။

Deep Freeze Install ျပဳလုပ္ျခင္း
Deep Freeze ကို
(၁) Deep Freeze Administrator Installation
(၂) Workstation Creation , and
(၃) Workstation Installation
အဆင့္ (၃) ဆင့္ျဖင့္ Install ျပဳလုပ္သြားမည္။

(၁) Deep Freeze Administrator Installation

(က) Deep.Freeze.Ent.v6.10.220.1616.exe ကို Double Click ႏွိပ္ဖြင့္လိုက္ပါ။
(ခ) Install လုပ္ပါ။
(ဂ) Deep Freeze Administrator Installation ျပဳလုပ္ျခင္း ၿပီးစီးၿပီ ျဖစ္သည္။


(၂) Workstation Creation

(က) Start > All Programs > Faronics > Deep Freeze 6 Enterprise > Deep Freeze 6 Administrator ကို ဖြင့္ပါ။
 
(ခ) Code ထည့္ေပးပါ။
( ဂ ) Ok and Exit ေပးပါ။
(ဃ ) ေပၚလာေသာအခါ Configuration tab ကိုေရြးပါ။ Workstation တြင္ Check လုပ္ၿပီး Password ထည့္ေပးပါ။
 
( င ) မိမိေပးခဲ့ေသာ Password ကို လံုး၀မေမ့ပါေစႏွင့္။ မွတ္သားထားပါ။ ယခုေပးလိုက္ေသာ Password သည္ Deep Freeze အား Control လုပ္မည့္ Password ျဖစ္သည္။
( စ ) Drives ကိုေရြးပါ။ ကၽြန္ေတာ္ကေတာ့ Deep Freeze ကုိ Drive C တခုတည္းကိုသာ ထိန္းခ်ဳပ္ထားခ်င္တာမို႕လို႕ ေအာက္က ပံုအတိုင္း Drive C တစ္ခုတည္းကိုဘဲ Check လုပ္ပါ့မယ္။
အဲလို Drive C ကိုဘဲ ထိန္းခ်ဳပ္ထားမယ္ဆိုရင္ အျခား Drive ေတြမွာ ဖိုင္ေတြသိမ္းတာေတြ၊ ဖ်က္တာေတြ၊ ျပဳျပင္ေျပာင္းလဲတာမ်ိဳးေတြ လုပ္ေဆာင္ခြင့္ရေနမွာ ျဖစ္ပါတယ္။ လုပ္ေဆာင္ခြင့္ ေပးခ်င္လွ်င္လည္း ေပးခ်င္ေသာ Drive ကို Check လုပ္ၿပီး ေပးထားလုိက္ပါ။

(ဆ) Create Program Tab ကို ဖြင့္ပါ။
( ဇ ) Create a full workstation installation စာေဘးမွ ၀က္၀ံပံုအား ႏွိပ္ပါက ေအာက္ပါပံုအတိုင္း ေတြ႕ျမင္ရၿပီး C:\Program Files > Faronics > Deep Freeze 6 Enterprise > Install Programs ေနရာတြင္ save လုိက္ပါ။
ေေ
(စ်) Workstation Creation ျပဳလုပ္ျခင္း ၿပီးစီးၿပီ ျဖစ္သည္။

(၃) Workstation Installation

(က) C:\Program Files > Faronics > Deep Freeze 6 Enterprise > Install Programs ေနရာသို႕ ေရာက္ေအာင္သြားၿပီး ေအာက္ပံုတြင္ ေတြ႕ျမင္ရေသာ Df6Wks.exe file အား Install လုပ္ပါ။
( ခ ) Install လုပ္ပါ။
( ဂ ) Accept အား Check လုပ္ၿပီး Next လုပ္ပါ။
(ဃ) Finish လုပ္ပါ။
( င ) အနည္းငယ္ Wait ေနၿပီးပါက ကြန္ပ်ဴတာသည္ သူ႕ဘာသာသူ Restart လုပ္ၿပီး ျပန္ပြင့္လာေသာအခါ သင့္ ကြန္ပ်ဴတာ၏ ညာဘက္ေထာင့္ေအာက္ေျခတြင္ ၀က္၀ံပံု ေလးေပၚေနၿပီး ေအာက္ေဖာ္ျပပါပံုအတိုင္း ေတြ႕ျမင္ရမည္ ျဖစ္သည္။
( စ ) Workstation Installation ျပဳလုပ္ျခင္း ၿပီးစီးၿပီ ျဖစ္သည္။

Deep Freeze Software အား မိမိစိတ္ႀကိဳက္ အသံုးျပဳျခင္း

Deep Freeze ဆိုတာက အေပၚမွာ ေျပာခဲ့သလုိဘဲ Security Software ျဖစ္တဲ့အတြက္ ဒီ Software ကို အသံုးျပဳဖို႕အတြက္လည္း Security ျမင့္ပါတယ္။
အခုဆိုရင္ ကၽြန္ေတာ္က Drive ကို Drive C [ Window XP ( Operating System, OS ) ရွိေနေသာ Drive ] မွာေရြးခ်ယ္ထားခဲ့တဲ့အတြက္ ဒီကြန္ပ်ဴတာမွာ မည့္သည့္ Software မွ Install ျပဳလုပ္ျခင္း ၊ My document and Destop ေပၚမွာ Data မ်ားေပါင္းထည့္ျခင္းတို႕ကို ျပဳလုပ္လုိ႕ရမွာ မဟုတ္ေတာ့ပါဘူး။ ေအာက္ေဖာ္ျပပါပံုမွာ ေရြးခ်ယ္ခဲ့တာကို ဆိုလုိတာ ျဖစ္ပါတယ္။
အထူးသတိျပဳ
မွတ္ခ်က္။ ။User က New Software Installation ျပဳလုပ္ျခင္းႏွင့္ My document and Destop ေပၚမွာ Data မ်ားေပါင္းထည့္ျခင္းတို႕ကို ေခတၲခဏ လက္ခံထားမွာျဖစ္ေသာ္လည္း Restart ျပဳလုပ္လုိက္ပါက ယခင္မူလ အေနအထားကို သူ႕အလိုလို ျပန္ေရာက္ေနမွာ ျဖစ္ပါတယ္။ Drive D, E,… စသည္ျဖင့္ အျခားေသာ Data မ်ား သိုေလွာင္္ထားရာ Drive မ်ားကိုလည္း Check လုပ္ေပးခဲ့ပါက Data မ်ားေပါင္းထည့္ျခင္းတို႕ကို ေခတၲခဏ လက္ခံထားမွာျဖစ္ေသာ္လည္း Restart ျပဳလုပ္လုိက္ပါက Data မ်ားပ်က္သြားမည္ျဖစ္သည္။
ဒါေၾကာင့္ Internet သံုးစဲြျခင္းေၾကာင့္ Virus ၀င္ေရာက္လာျခင္း၊ MemoryStick သံုးစဲြျခင္းေၾကာင့္ Virus ၀င္ေရာက္လာျခင္း ၊ Local Area Network (LAN) အတြင္းမွ Virus ၀င္ေရာက္လာျခင္းတို႕ကို ကာကြယ္ေပးႏိုင္မွာ ျဖစ္ပါတယ္။ မိမိကြန္ပ်ဴတာမွာ Virus ရွိေနၿပီဟု ယူဆလွ်င္ Restart ေလးသာ ျပဳလုပ္လိုက္ပါ။ အားလံုး ယခင္မူလ အေနအထားအတိုင္း ေရာက္သြားပါလိမ့္မည္။

ယခင္ မူလအေနအထားဆိုတာ ဘာလဲ ? ၊ ဘယ္အခ်ိန္တုန္းက မိမိ၏ကြန္ပ်ဴတာ System အေနအထားကို ေျပာတာလဲ ?

ကၽြန္ေတာ္တို႕ မိမိကိုယ္တိုင္ကလည္း ကြန္ပ်ဴတာကို Software အသစ္ထပ္ၿပီး Install လုပ္ခ်င္တာတို႕ ၊ Data မ်ား ထပ္ၿပီး ထည့္ခ်င္တာတို႕ကို လုပ္ေနမွာ ျဖစ္ပါတယ္။ ဒါေပမယ့္ Deep Freeze က Enable ျဖစ္ေနရင္ ကၽြန္ေတာ္တို႕ကိုယ္တို္င္လည္း ျပဳလုုပ္လို႕ရမွာ မဟုတ္ပါဘူး။ ဒါေၾကာင့္ မိမိကြန္ပ်ဴတာကို Software အသစ္တင္ခ်င္လွ်င္ ျဖစ္ေစ ၊ Data မ်ား ထပ္ၿပီး ထည့္ခ်င္လွ်င္ျဖစ္ေစ ၊ မိမိကြန္ပ်ဴတာကို အျခားေသာ မိမိစိတ္ႀကိဳက္အရာမ်ား ျပဳျပင္ေျပာင္းလဲခ်င္ပါက Deep Freeze အား Disable ျပဳလုပ္ထားမွသာ လုပ္ခ်င္ရာ လုပ္လို႔ရမွာ ျဖစ္ပါသည္။

Deep Freeze အား Disable ျပဳလုပ္နည္း

(က) Shift + ညာဘက္ေအာက္ေျခေထာင့္တြင္ရွိေသာ Deep Freeze ( ၀က္၀ံပံု ) ေလးအား Double Click ႏွိပ္ပါ ( သို႕ ) Ctrl + Alt + Shift + F6 အား တၿပိဳင္တည္းႏွိပ္ပါ။ ေအာက္ပါပံုအတိုင္း ေတြ႕ျမင္ရမည္။ ( ၁၀ စကၠန္႕ အတြင္း ဘာမွ မလုပ္ပါက သူဘာသာသူ ေပ်ာက္သြားမည္ျဖစ္သည္။ )
( ခ ) Password ရိုက္ထည့္ပါ။ ေအာက္ေဖာ္ျပပါ အဆင့္တုန္းက ေပးထားခဲ့ေသာ Password ကို ဆိုလုိပါသည္။
 
( ဂ ) ေအာက္ေဖာ္ျပပါ ပံုအတိုင္းေတြ႕ျမင္ရပါက Boot Thawed ေရြးခ်ယ္ၿပီး OK ေပးပါ။
 
(ဃ) ထို႕ေနာက္ Restart ျပဳလုပ္လုိက္ပါက ကြန္ပ်ဴတာျပန္ပြင့္လာေသာအခါ ညာဘက္ေထာင့္ေအာက္ေျခရွိ ၀က္၀ံပံု ေလးတြင္ အနီေရာင္ၾကက္ေျခခတ္ ျပထားသည္ကို ေတြ႕ျမင္ရမည္ျဖစ္ပါသည္။
 
( င ) Deep Freeze အား Disable ျပဳလုပ္ျခင္း ၿပီးစီးၿပီ ျဖစ္သည္။

Deep Freeze အား Disable ျပဳလုပ္ထားေသာ ယခုအခ်ိန္တြင္ သင္ … သင္၏ ကြန္ပ်ဴတာကို စိတ္ႀကိဳက္ ျပင္ဆင္ႏိုင္ၿပီ ျဖစ္ပါသည္။
ကၽြန္ေတာ္ေျပာခဲ့ေသာ ယခင္မူလ အေနအထားဆိုသည္မွာ သင္၏ကြန္ပ်ဴတာတြင္ Deep Freeze အား ပထမဦးဆံုးအႀကိမ္ Install မလုပ္ခင္ကအေနအထားႏွင့္ ယခုကဲ့သို႕ Deep Freeze အား Install ျပဳလုပ္ထားေသာ္လည္း Disable ျပဳလုပ္ၿပီး သင္… ျပင္ဆင္ထားေသာ အေျခအေနမ်ိဳးကို ဆုိလုိသည္။

ျပင္ဆင္ျပဳျပင္ၿပီး မိမိကြန္ပ်ဴတာအား Deep Freeze ျပန္လည္ အသက္ ၀င္ေစျခင္း

မိမိျပင္ဆင္ခ်င္တာ အားလံုးျပင္ဆင္ၿပီးပါက Deep Freeze အား ေအာက္ေဖာ္ျပပါ အတိုင္းျပန္လည္အသက္သြင္းရေအာင္…
(က) Shift + ညာဘက္ေအာက္ေျခေထာင့္တြင္ရွိေသာ Deep Freeze ( ၀က္၀ံပံု )
ေလးအား Double Click ႏွိပ္ပါ ( သို႕ ) Ctrl + Alt + Shift + F6 အား တၿပိဳင္တည္း ႏွိပ္ပါ။
( ခ ) ေအာက္ေဖာ္ျပပါပံုအတိုင္း ေပၚလာေသာအခါ Boot Frozen အား Check လုပ္ၿပီး Ok ေပးပါ။
 
( ဂ ) ကြန္ပ်ဴတာကို Restart ျပဳလုပ္ပါ။ Deep Freeze သည္ ျပန္လည္ၿပီး Enable ျဖစ္သြားမည္။ ေနာက္တစ္ႀကိမ္ ကၽြန္ေတာ္တို႕ Restart မလုပ္ခင္ မူလအေနအထားသည္ ယခုအေနအထားပင္ျဖစ္သည္

Deep Freeze အား Uninstall ျပဳလုပ္ျခင္း

Deep Freeze ကို Uninstall ျပဳလုပ္ရန္အတြက္
(က) Deep Freeze ကို Disable ျဖစ္ေနေအာင္ အရင္လုပ္ပါ။
( ခ ) ညာဘက္ေထာင့္ေအာက္ေျခရွိ ၀က္၀ံပံုမွာ အနီေရာင္ၾကက္ေျခခတ္ ျဖစ္ေနရမည္ ျဖစ္ပါသည္။
( ဂ ) ထိုသို႕ ျဖစ္ေနေသာအခါ
“ C :\> Program Files > Faronics > Deep Freeze 6 Enterprise > Install Programs “
သို႕ေရာက္ေအာင္သြားၿပီး ျမင္ေတြ႕ရေသာ “DF6Wks.exe” file အား Double Click လုပ္ၿပီးဖြင့္လိုက္ပါ။ ေအာက္ပါအတိုင္းေတြ႕ျမင္ရၿပီး Uninstall ျပဳလုပ္ပါ။

(ဃ) Ok to Uninstall ကို Check လုပ္ၿပီး Finish လုပ္ပါ။
( င ) ကြန္ပ်ဴတာက သူ႔ဘာသာသူ restart လုပ္သြားၿပီး စက္ျပန္ပြင့္
လာေသာအခါ ညာဘက္ေထာင္႕
 ေအာက္ေျခတြင္၀က္၀ံပံုေလး ရွိေတာ့မွာ မဟုတ္ေပ။
( စ ) Deep Freeze အား Uninstall ျပဳလုပ္ျခင္း ၿပီးစီးၿပီျဖစ္သည္။

Computer Spider အားေက်းဇူးအထူးတင္ရွိပါတယ္ဗ်ာ။


**  Step-1.ေအာက္က Download Button ကိုႏွိပ္လိုက္ပါ  


**  Step-2. "5sec". ေလာက္ေစာင္႕ေပးပါ။

**  Step-3. "  << SKIP AD >>   ".ကိုႏွိပ္ေပးပါ။

**  Step-4. Download Link က်လာပါလိမ္႕မယ္။


**  အဆင္ေျပပါေစဗ်ာ။
Credit by...Pyae Phyo (MMiTD)


http://zipansion.com/1uhHj


Related Posts Plugin for WordPress, Blogger...